DigiMixer – the app
This wasn't the post I'd expected to write, but after reading two comments in close succession on an old post when I first started playing with the X-Touch Mini I decided to spend some time effectively shuffling code around (and adding a primitive configuration dialog) so I could publish a standalone app for DigiMixer.
I want to be really clear: the app is not supported software". I'll try to fix bugs if they're reported in the GitHub repo but it's only best-effort in my spare time". If you don't need any of the functionality that's specific to the DigiMixer app (which as far as I'm aware is basically control via X-Touch Mini and Icon Platform surfaces") then I'd strongly recommend using Mixing Station instead. (Mixing Station supports full and X-Touch and X-Touch Extender surfaces, but doesn't mention the X-Touch Mini. It may just work in Mackie mode; I haven't tried it.)
Downloading the installerThe app can be downloaded from the releases" page on GitHub - note that that's also where the V-Drum Explorer is published, so be careful to pick the right file. You probably want the latest DigiMixer release, and download the .msix file. Run the file, and follow the prompts - you may get asked if you trust the author, Jonathan Skeet". That's up to you, of course!
ConfigurationOn first run, a default configuration with a single input and a single output, talking to a fake mixer abstraction, will be created. Use the Configure / Reconfigure" menu item to configure DigiMixer to talk to your actual mixer. You'll be presented with a dialog like this:
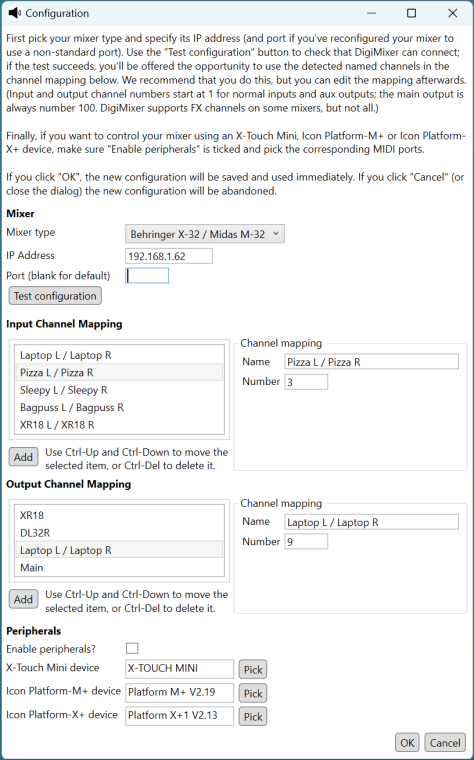
There are basically three stages to configuration:
- Choose the mixer hardware type and specify the IP address. There's no autodetection facility (of either address or hardware type), I'm afraid. Use the Test configuration" button to check that DigiMixer is able to connect.
- Choose which channels you want DigiMixer to control. The easiest way to start this is via the Test configuration" button - if it successfully connects to your mixer, it will find all the channels with a non-empty name, and suggest a mapping based on those. But you don't have to accept those mappings - you can edit, reorder, add and delete channels for both inputs and outputs. This means knowing the channel number that DigiMixer would use, but for input channels and aux channels that's generally just the same channel number shown in the supplier-provided mixer user interface. Stereo channels are automatically detected, so only add the left" channel. The main output left" channel is always 100.
- If you want to enable peripherals (and if you don't, why are you using DigiMixer?) tick the enable peripherals" box and pick the MIDI ports that correspond to the peripherals. (If they're not connected at the time but you know what the names will be, you can just type them in.
That's my first stab at the configuration user interface. I know it's not pleasant, but it's the best I could come up with in a very limited amount of time. (The configuration file lives in %LOCALAPPDATA%\DigiMixer and is just JSON, so if you're feeling bold you can edit it by hand.)
The app windowThe user interface itself is somewhat simpler than the configuration page:
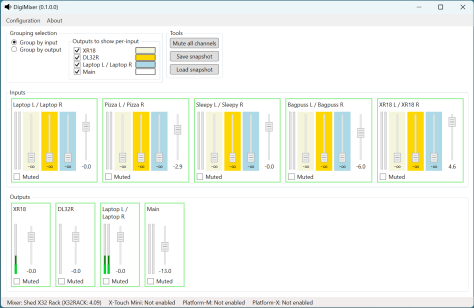
By default, DigiMixer presents each input with a set of faders (one per output). This isn't the normal way that most mixers show inputs, but it happens to be closer to what I personally use for church. If you want to group by output instead, just toggle the radio button in the top left. When grouping by input, there's a separate panel for overall output fader levels" at the bottom; when grouping by output, the panel at the bottom shows the meter levels for the inputs instead (without any faders).
You can show or hide channels within each group by checking or unchecking the checkboxes next to that. The tools on the right hand side should be fairly self-explanatory, although I should point out that snapshots probably won't survive reconfiguration (as the identity of channels can be lost; it's too complicated to explain in this post).
If you're using an X-Touch Mini, the first eight input channels are controlled by the knobs and the top row of buttons. The knobs change the fader level for the main output of each channel, and the buttons mute and unmute. (When the button is lit, the channel is on"; when the button is unlit, the channel is muted.) The bottom row of buttons control channels 9-16. Note that these first eight" and next eight" channels are in terms of how DigiMixer is configured; they're not necessarily channels 1-8 and 9-16 on regular mixer inputs. The main fader on the X-Touch Mini controls the main overall output volume.
Similarly, the Icon Platform M+ controls channels 1-8, and X+ controls channels 9-16.
ConclusionIt's possible that I'll write more documentation for the app at some point, but this was never part of the plan for DigiMixer. I'm not looking to add more features other than additional mixers (and the support for different mixers varies significantly - the X-Air and X32 support is by far the most complete), although I'll consider feature requests, of course.
The core aim of DigiMixer is still to explore the notion of abstraction, and I still hope to get to that properly in later posts! As it happens, refactoring my code to produce the app has made me consider a different kind of abstraction... the main user interface is used in DigiMixer, At Your Service, and an At-Your-Service-adjacent app which is designed to just run in the background, using configuration from At Your Service. So while the configuration dialog shown above is brand new, most of the user interface has been working in our church setting for a long time. More on that when I get into code, no doubt.
For the moment, I hope this meets the needs of folks hoping for a quick X-Touch Mini integration.