The Radiant Heat Experiment – Did it Work?

One whole year ago, I was in the depths of destroying and rebuilding a sagging 1950s brick ranch house, which has since grown up to become our actual home. Looking back through Google Plus's automatic archive of my phone pictures, I can see the "kitchen" was still open to the great outdoors on that date:
Despite the lack of windows and insulation, I was already looking ahead with nerdy engineering glee to building a home-brewed heating system for this place, and I told you about it in the article called The Radiant Heat Experiment.
In a nutshell, this involved running thousands of feet of PEX pipe under my existing wood floor via the crawlspace and circulating hot water through it with a pump and a good quality tankless water heater.
The plan was met with both enthusiasm (generally from fellow engineers) and scorn (more often from plumbers), and since then people have been sending in emails and comments to ask how it all went. Although I've already dropped a few hints that I'm very happy with the end result, this experiment came with some good lessons and pitfalls which are finally ready to share. I have also had a chance to measure the performance of the system (and the house in general) through most of a Colorado winter, and the numbers surprised me just a bit. So let's dig in.
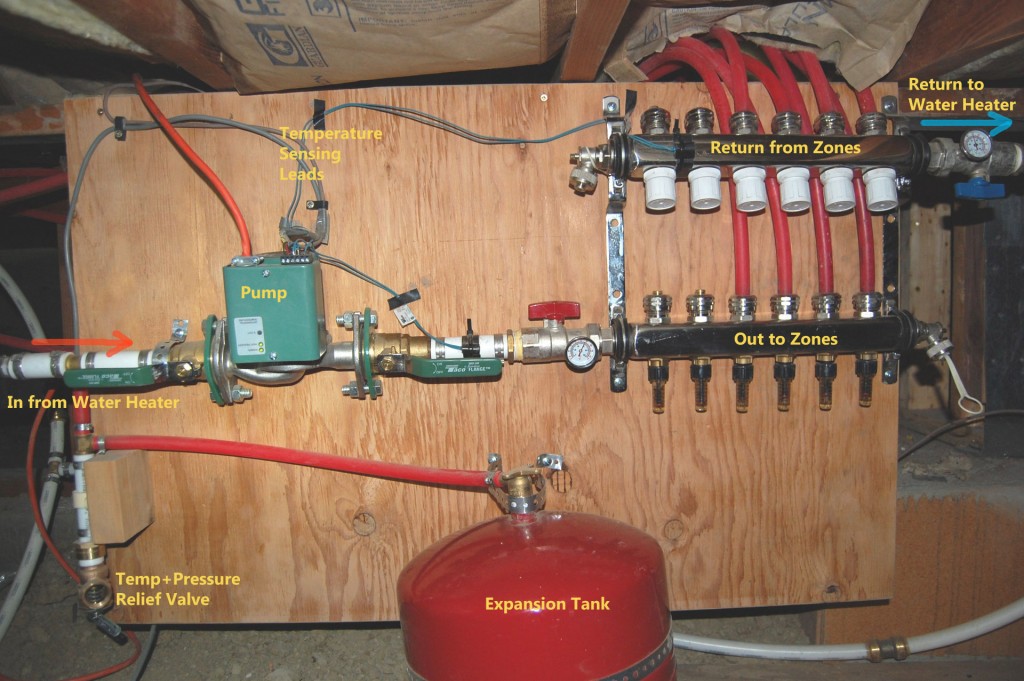
How it All Went TogetherLast time I presented you with a daunting list of parts. The list makes a lot more sense when you stick everything together. Here is a picture of the heart of my setup as it stands now, with everything screwed onto a plywood board:
This funny part is that all of the brains of the system are right there on the board. All the research and shopping boils down to just that 2i-3 foot rectangle. The input is hot water from your water heater on the left, 120 volt electricity for the pump through the orange cord, and a pair of small wires you connect to your thermostat to indicate "ON". Then the hot water flows out through the zones, delivers its heat to your house, flows back into the cold side of the manifold, and returns to the heater for another round. If DIY radiant heat were more common, this whole setup would come as a single product for $199 at Home Depot instead of the $600 or so you see here.
It took only about two hours to attach all this together, and then I confidently crawled down under the house with it to get to work on the rest of the installation. Little did I know that the real work was yet to begin.
Running the Heating Tubes
This system proved to be quite torturous to build, but it was because of plain old physical challenges rather than anything technical or mental. The problem is that to install radiant heat below the floor of a wood-framed house, you need to thread a huge length of stiff, fussy pipe through an unyielding grid of tightly spaced floor joists. I divided my house into six zones, each one about 250 square feet in area. For each of those zones, I had to do the same steps:
- Meticulously review the underside of each joist bay and clear out any remaining scraps of duct work, old plumbing, spider webs, etc.
- Grind off a few hundred flooring nail ends poking through from the original Oak floor above using a cordless grinder with a cutoff wheel
- Drill a 7/8"^3 hole through the end of each joist
- Pull through the whole required length of PEX pipe, fighting the stiff tangly coil the whole way
- Staple it up to the underside of the floor, using aluminum reflector plates
- Run the ends of the tube back to the manifold and connect them into the system
- Cut and fit R-13 insulation batts underneath the whole area to force the heat upwards into the floor instead of down into the crawlspace.
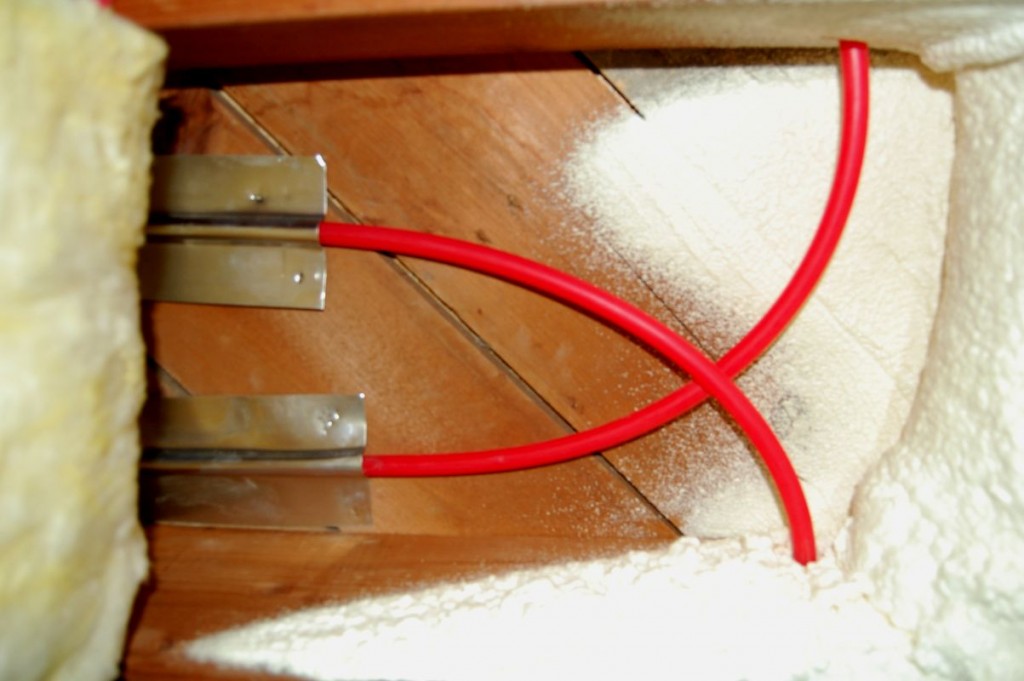
The end result in each bay looks something like this:

Here's the end of one joist bay. Tubing, aluminum diffuser plates (optional), R-13 insulation batts underneath (essential). The fluffy spray foam insulation on the right is part of my new crawlspace insulation - not strictly related to a radiant system but handy for keeping the resulting heat from leaking out through the rim boards of your house.
I found that each 250 square foot zone took about eight hours of work. But not just a casual eight hours that flies by like it does when installing kitchen cabinets while your radio plays happy bluegrass music in the background. This is eight hours of proper torture, crawling in a 40-inch-high space with sharp rocky dirt beneath and obstacle-laden floor joists above. Even the slightest movement stirs up thick dust, so you have to wear a full-face respirator. That's handy, since the grinder also throws down hot metal sparks towards your eyes and face. Gloves and kneepads are essential too. And ear protection. It's dark down there, so you also have a bright LED headlamp strapped over top of all the other accessories on your head. But the ground-driven temperature of 60 degrees is far too warm for the work pants and long sleeves you need to wear to avoid skinning your arms and legs, so you also sweat a lot. In general, I could only withstand about 2 hours of this work at a time, so each zone was done over four days.
But if the paragraph above sounds horrible, you're just thinking about it wrong. This is voluntary hardship at its best. The physical and mental benefits of crawling and sweating and fighting with stubborn tools and materials for so many hours are incomparable. Every possible move is constrained, so you must overcome the constraints with strategy and strain. The feeling of suiting up and descending into the crawlspace each morning while knowing I could earn much more money by outsourcing the activity and instead simply typing a bit more shit into this computer was enlightening. The feeling of emerging two hours later into the fresh air and bright sunlight, stripping off the dusty clothes and seeing the beauty of the world again was life itself.
Even with all that struggle and joy, I paused the effort* after finishing four of the six zones. Those cover the primary areas of the house and are more than enough to keep up with our heating needs for the rest this year. I'm finishing up the main floor carpentry and a second bathroom, and those last two zones will go in before next winter.
Real World PerformanceThe Living Experience
This was the unexpected surprise - how nice it is to have warm floors. Your feet get a pleasant reward with every step you take, or as you rest them on the wood floor under the dinner table. On top of that, anything you leave on the floor gets extra toasty: a pair of wet winter boots, a forgotten coat, or even the socks you threw off before hopping into bed - perfectly warm and dry when you pick them up the next morning. The bathroom floor also dries quickly after a shower.
Keeping up with the Cold
On a "normal" January day in my part of Colorado, daytime temperatures reach about 43F/7C, but the extremely bright sunshine makes it feel much warmer. The South-facing glass of the house sucks in about 10,000 watts of heat at high noon and it gets stored in the copious thermal mass of the various interior stone and brick walls. I blow it around with a ceiling fan to accelerate this process and the interior temperature reaches a peak of around 76F in the afternoon. Then the sun goes down, the stored heat is gradually released, and we make it through the night (low around 20F) with the house dropping to a comfortable 66. If you're lucky, the sun rises into a clear sky the next morning and you repeat the cycle - with no heating required at all!
But weather adjacent to the Rocky Mountains is anything but consistent, and this winter we have also seen an all-time record low of -26C (-14F) as well as a daytime high of 77F (25C) just a few weeks later. This is why you still need a heating system with some juice.
With only four zones running at -26C, my house was a bit underpowered - the temperature would drop slowly unless we lit a fire (the house also has a high-efficiency EPA woodstove). From a standstill, the system also takes about two hours to get the floors to their full operating temperature of 80F. However, the remaining two zones should provide the extra bit needed to keep up in worst case conditions.
Efficiency
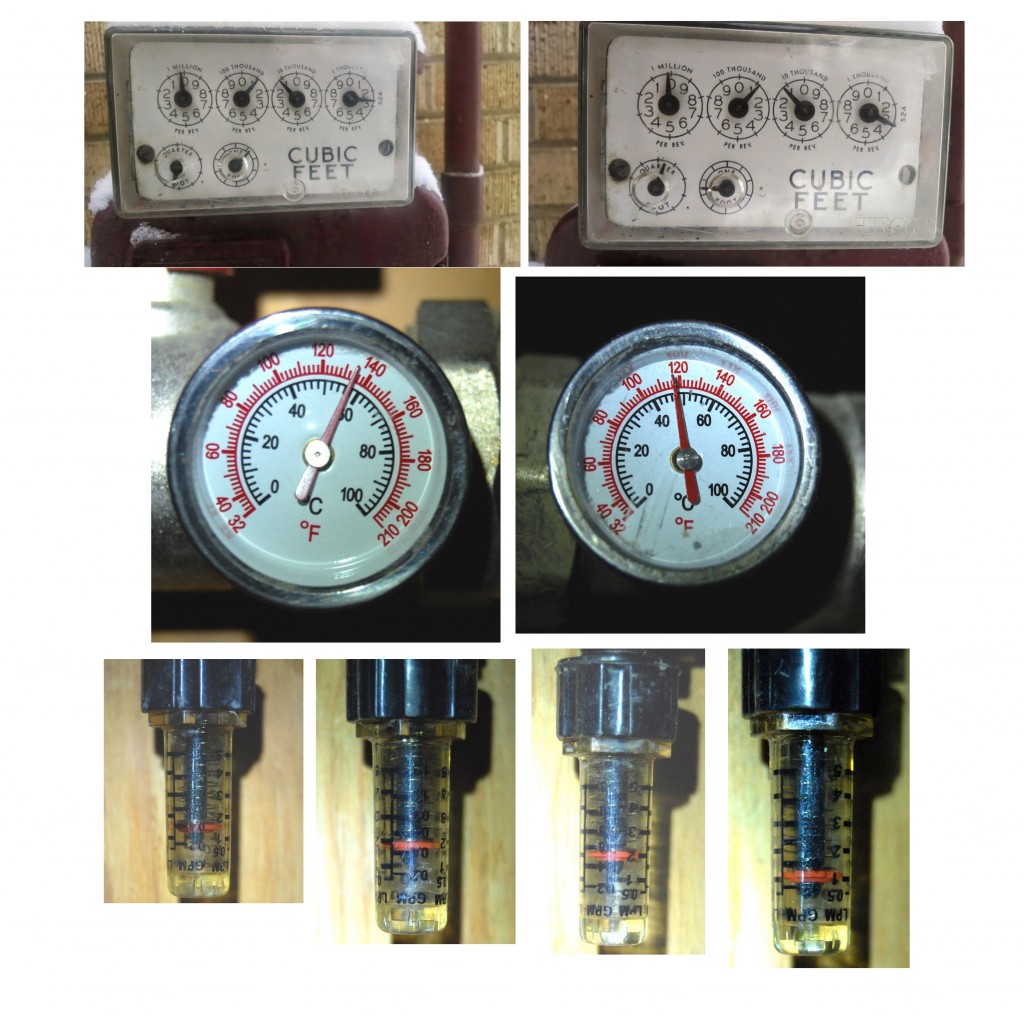
To test this, I had to calculate the amount of natural gas I burned every hour, and compare it to the amount of heat actually being pumped into the house. I did this by cranking up the system on a cold day and taking "before" and "after" readings of the gas meter, and noting the flow rate and temperature drop** across the whole system:

Here are the things you need to look at to calculate system output and efficiency.
To make a long story short, the gas meter told me I used 40 cubic feet of natural gas over my 144 minute test period. The gas bill tells me that each 100 cubic feet is 0.945 "therms " (94,500 BTU) worth of heat. One therm costs 62.67 cents in my area. The net result is I was consuming 15,740 BTU per hour of gas, which is just under 10 cents worth per hour.
Next, I added up the (approximate) flows of those four flow meters and saw the system was pumping out 1.68 gallons per minute of water with a 16.5 degree F rise. You can calculate the energy delivered to the water with the "Universal Hydronic Formula" like this:
1.68 GPM x 16.5 degrees x 500 = 13,680 BTU per hour
Back in the design stage, this is roughly the heat loss I calculated my house would experience at a temperature of 20F, so the numbers seem realistic to me. Also, dividing the output by the input, we get a water heater efficiency of 88%, which is close to my unit's stated efficiency of 94% (efficiency rises for lower input water temperatures, so I'm very happy it can perform this well with a 118F input).
On top of all this, I measured total electricity consumption (for the tankless heater and water pump combined) at only 55 watts, which is under $4 per heating month even if you run the system 24 hours a day. To add it all up, my home's total gas cost this year breaks down roughly like this:
Gas company fixed monthly fee whether you use any or not: $12
Regular monthly gas use for showers, laundry, dishwasher, cooking, etc: $4
Heating for Oct 14 - Nov 12: $8
Heating for Nov 12-Dec 15: $55
Heating for Dec 15 - Jan 16: $58
And that's probably the peak - here in February, the weather is already warming up and the system is off most of the time again.
So What's the Catch?When I started this experiment, I was optimistic that we could revolutionize home heating and make the forced air gas furnace obsolete. After all, the cost is lower, living comfort is greater, and you save a lot of interior space that would normally be consumed by ducts and chases - especially in multi-story homes. But until the industry advances a bit, there are a few flaws:
Building was Quite a Bitch
Installing this was near the limits of my skill and endurance, and I'm a not-all-that-old dude with lots of great tools who has been building things for over 30 years. However, it would be much easier if you installed it in an unfinished basement instead of a crawlspace. Also, recruiting as many friends as possible to thread the pipe will speed you up exponentially. Overall, I'd recommend it only for experienced handypeople.
Heat Output is Lower than Expected
I'm getting under 14,000 BTU per hour over the 1000 square feet I have installed so far. This works out to 14 BTU/hr per square foot. This place is pretty well insulated, so I should be fine. But an older and draftier house would lose more heat. The problem lies in the slow transmission of heat through the 1.5 inches of my subfloor and the oak floor above it. To increase that, I'd need to raise the water temperature further (it is already at 140F) or add some extra radiators.
On the positive side, you can get really creative with radiant heat, embedding the tubes into tile walls, or making heated towel racks in your bathroom that tie into the system. Each extra heated feature will deliver more BTUs. Also, installing under a tile floor instead of wood floor will increase heat transmission.
Not all Tankless Water Heaters will Work
In reader feedback, I heard stories of tankless heaters dying early or cycling constantly. Cycling is not a problem with the unit I used*** - it runs at variable speed so the system quickly reaches a nice loafing steady state where the pump is going slowly and the heater is barely murmuring to match the required flow and temperature rise. Time will tell how long it lasts, but I'm betting it will prove to be far more cost effective than a $3000 boiler.
The Open Loop System Has Drawbacks (as well as advantages)
I am using a single tankless heater for both home heating and domestic hot water - this is called an "open loop" configuration. It would be easy to add a second basic heater for $600 for the domestic water. This would separate the water systems, and I may do that someday.
The main drawback of combining them that you need to keep the water heater set very high (140F) to get enough heat output to the floors. This means somewhat fussy water temperature balancing in the shower, whereas with a dedicated tankless heater you just type 110F into its remote control unit, crank the hot water handle, and enjoy a computer-regulated perfect shower every time.
A second issue is that the hot water can sometimes smell like new plastic pipes. This effect is fading now that we've been running the system for several months, but it does mean the hot water will never be tasty enough for drinking or to use in cooking,
On the positive side, I found that if you run hot water when the pump is off, water is drawn through the system through natural pressure differences. This means that in the summer, my floors will actually be cooled down by the cold water supply as it sucks unwanted heat from the house. So the floors will pre-heat the water before it hits the water heater. Double energy savings and free air conditioning.
Because the water supply is constantly refreshed and/or heated to 140 degrees Fahrenheit, bacteria growth and stale water in the pipes is not an issue at all.
Summary
It has been a worthwhile experience. Loads of learning, plenty of hard labor, a luxurious end project, and an $8,000 savings over having a new forced air furnace and duct system installed into this house. Although DIY radiant heat is not for everyone, I can declare this particular experiment a success.
--
* To finish up next fall, I will also swap out the manual adjustment dials (white knobs in the picture) for electrically controlled actuators, and use a multi-zone WiFi thermostat to control the whole house. This thermostat is being developed by an MMM reader who has started his own company to produce it - more details on that in a future story.
** The temperature drop is configurable with a little knob inside the computer-controlled circulator pump by Taco. I set my own pump to maintain a differential of 20 degrees F, which is typical for a system like this. Then if the pump starts seeing a drop of more than 20 degrees, the pump runs faster to compensate. If it is less, it means your house is already warm so the pump runs slower.
*** This has proved to be a kickass water heater so far. If you decide to pick one up from GP conservation as I did, try coupon code "MMM" - when I last checked they were running a small discount plus free shipping on tankless heaters for readers of this blog.

