The AxiDraw MiniKit Is the Modern XY Plotter You Didn’t Know You Wanted
 Illustration: James Provost
 I'll be honest: when the original AxiDraw came out from Evil Mad Scientist Laboratories in 2016, I thought it was cute but a curiosity. My thought was that if you were going to play around with reintroducing the venerable technology of the pen-and-paper X-Y plotter, why not do something really different, like the iBoardBot remote-controlled erasable miniature whiteboard? And the AxiDraw's US $475 price tag felt steep for a spindly-looking contraption that required the user to manually position each sheet of paper, one at a time.
Boy, was I wrong. The AxiDraw took off-folks have embraced it for creating generative art, making microfluidic systems with wax, laser cutting, engraving of all types, testing computer mice, and much more. In short, it became a general-purpose platform for all sorts of experiments, and the reason was also the reason for that high price tag: the AxiDraw's consistent precision. But there's a way to get that precision and start experimenting for less money, albeit with a couple of trade-offs, with the $325 AxiDraw MiniKit, which came out late last year.
The first trade-off is the size: the MiniKit's drawing area is 15 by 10 centimeters, while the standard AxiDraw can handle up to 30 by 21.8 cm. But the MiniKit's smaller size may be a boon to some, fitting better on a desk or workbench, and easier to transport. The second trade-off is time, specifically yours, because the MiniKit is the first AxiDraw to come in build-it-yourself kit form.
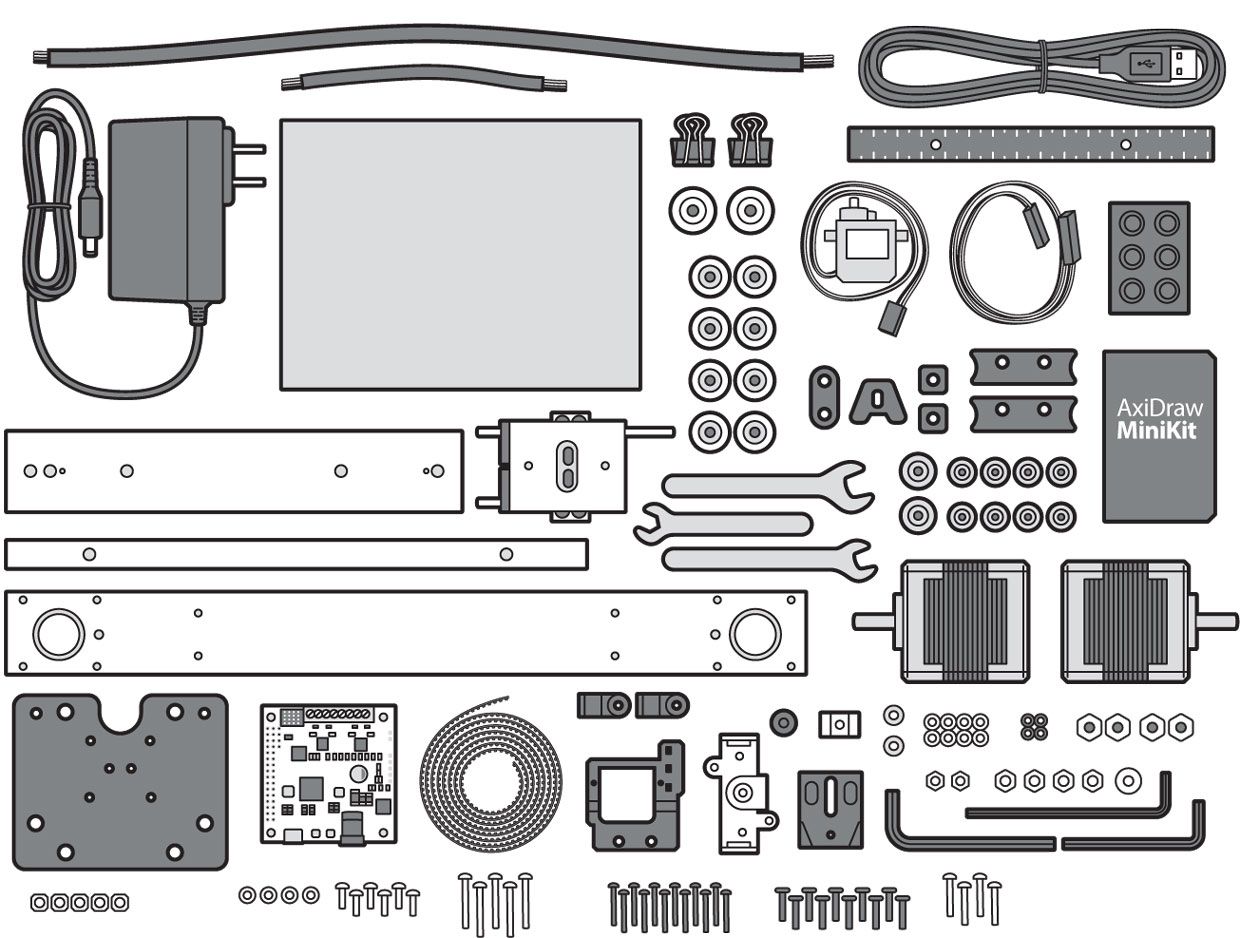
 Illustration: James Provost Electromechanical Medley: The AxiDraw MiniKit takes a few hours to assemble and adjust. Specialized tools, such as a Torx L-wrench, are included, but you must supply some conventional tools, such as a screwdriver. The aluminum rails have sharp edges that require care during assembly, but end caps are included to protect users. Drawing implements can be held either vertically, or at a 45-degree angle, which is more suitable for things like fountain pens. The MiniKit is controlled via free software that can plot vector files, including stipple portraits or handwriting fonts.
 As someone who is a lot more confident with circuits than cogs, assembling the MiniKit looked a little daunting at first. All kinds of wheels, minutely varied screws and washers, and various mystery components were crammed into the box. Fortunately, the instructions are some of the most thoughtfully detailed that I've ever seen, with many pictures and tips on identifying the M3x8 button-head screw versus the M4x8 torx tapping screw.
The MiniKit's x-axis is formed by one long fixed rail. A movable chassis runs along this rail, and it supports the y-axis rail in turn, to which the penholder is affixed. Construction took a few hours: The trickiest parts were getting the toothed drive belt in position with adequate tension and adjusting the wheels that grip the MiniKit's rails so that things can move freely but without any looseness.
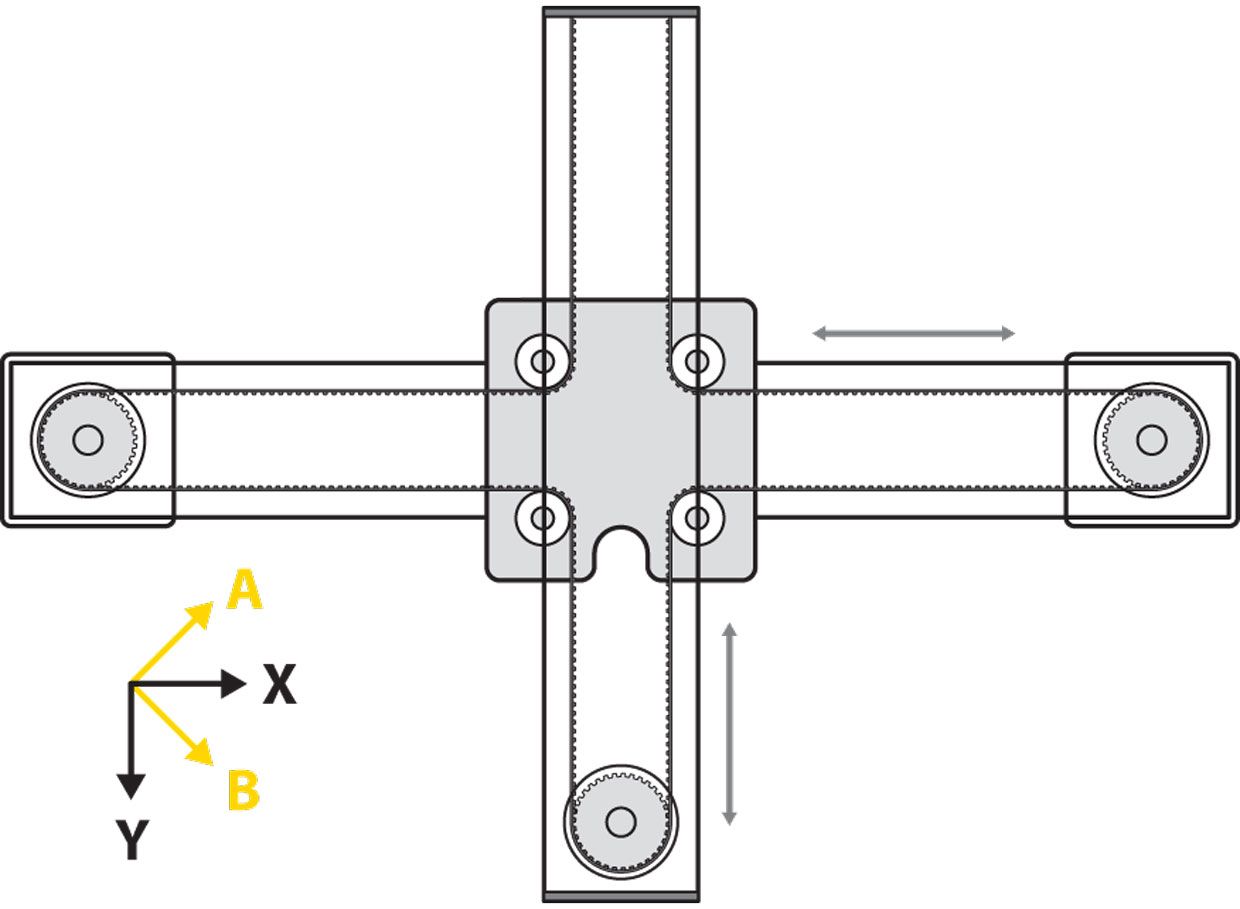
The MiniKit uses two stepper motors to position the penholder, but rather than having the motors drive motion along the x and y axes directly, both motors are placed on opposite ends of the x-axis rail. The drive belt is looped through the movable chassis and along the y-axis in such a way that turning one motor while holding the other in place causes the penholder to move at a 45 degree angle to the rails-if the MiniKit were a compass, this would be along the NE to SW line. Turning the other motor, while holding the first one still, moves the penholder along the NW to SE line. This means the axis controlled by each motor is effectively rotated through 45 degrees, so the MiniKit's microcontroller takes care of mapping incoming x-y coordinates to the appropriate motor signals.
The MiniKit is primarily controlled from a desktop or laptop using an extension to Inkscape, an open source vector-drawing tool. The software is also required for the final assembly step: calibrating the servo that raises and lowers the penholder. However, many other software options for controlling AxiDraw plotters exist, and it's pretty straightforward to write your own code using the Processing language, which is designed for creating computer-assisted and computer-generated art, or write a Python script.
Once I had the servo calibrated and pushed the penholder by hand to its home position in the upper left corner of a page, I fitted a roller-ball pen into the MiniKit-you have a choice of holding pens in a vertical or slanted position, the slant being especially suitable if you want to try, say, a fountain pen. The test graphic rendered perfectly, first time, scratching out a welcome message in a font that's a believable imitation of cursive handwriting (or at least how we used to write cursive, before keyboards caused our penmanship to atrophy).
Evil Mad Scientist Laboratories also offers a handy free stand-alone utility program called StippleGen. You can feed an image into the utility, and it creates a version made up of monochromatic stippled dots of various sizes. The number of dots and their size range is controllable, and the program also tries to determine the best, shortest, path between the dots, so as to minimize the amount of time that the AxiDraw spends moving around.
 Illustration: James Provost Axial tilt: The rotations of the MiniKit stepper motors do not directly correspond to the x and y axes. Instead, its belt arrangement means that holding one motor still and turning the other moves the drawing head along either a or b axes, as shown. The onboard microcontroller takes care of the math required to transform x and y coordinates to a and b coordinates.
 The resulting file can then be imported into Inkscape and plotted. Warning though: This can take quite a while. For my first test I used a photo of some Irish passage graves, which needed about 5,000 dots to be recognizable: It took about 2 hours to complete drawing the image, taking over a second to draw each dot and move to the next. (I was able to shave quite a bit off that time by reducing how high the MiniKit lifted the pen between dots in later tests.) The stipple plots work best with faces, which tend to be discernible at lower dot counts than other photographic subjects, no doubt due to the specialized facial-recognition neural hardware in our brains.
In short, the AxiDraw MiniKit rewards experimentation-there are many things to try, but you don't have to master them all before you get rewarding results. And if nothing else, it should make addressing envelopes easier!