An MPGuino Fuel-Economy Computer with a Retro Look

Russia's invasion of Ukraine and the skyrocketing fuel prices that ensued last year got me thinking about how to cut down on my consumption of gasoline. I thought briefly about purchasing a car that got better gas mileage, but it made sense first to see how much fuel economy I could eek out from the aging econobox I am now driving: a 1991 Toyota Corolla.
Possible strategies for improving its fuel economy include putting on some low-rolling-resistance tires, adding a shroud below the engine compartment (to reduce aerodynamic drag), even removing the alternator (as some racers do) or having it operate only when braking. And just driving it differently could also help a great deal.
I knew, though, that it was going to be difficult to test out different driving techniques without more immediate feedback of their effects on fuel economy. Many newer cars show instantaneous fuel consumption on the dash. Mine doesn't. Nor would this be something easy to add.
Owners of most vehicles can purchase, for example, a ScanGauge and plug it into the OBD-II (On Board Diagnostics II) data port of their cars, which would allow them to view an estimate of instantaneous MPG while driving. But my car was manufactured years before OBD-II became standard.
So I decided to revisit a project I first explored in 2009, when I installed an Arduino-based fuel-economy computer dubbed MPGuino" in the car that I was driving at the time. An MPGuino taps into two signals available at a car's electronic control unit (ECU): One is from the vehicle-speed sensor; the other runs the fuel injectors. With those two signals, an MPGuino can calculate how fast the car is going and how much fuel it is using, so it can show the driver instantaneous fuel economy in miles per gallon (MPG). It also records the amount of fuel used and the distance traveled over longer periods, so it can display average MPG for a single trip, or for the last tank of gas.
I recall that this gizmo was very helpful. But having since sold the car in which I had installed it, I would need now to find another MPGuino for my Corolla.
Although the software side of MPGuino is still being actively developed, hardware for it is now harder to come by. The companies listed on the MPGuino Wiki page as selling MPGuino boards or kits at one time are now out of that business. But it wasn't too difficult to cobble one together from schematics using an Arduino (I used an Arduino Nano), a 16-by-2 LCD display board, and a few discrete components.
I recalled, though, how much I didn't like having to look at that tiny LCD display while driving. So this time around I was determined to do better.
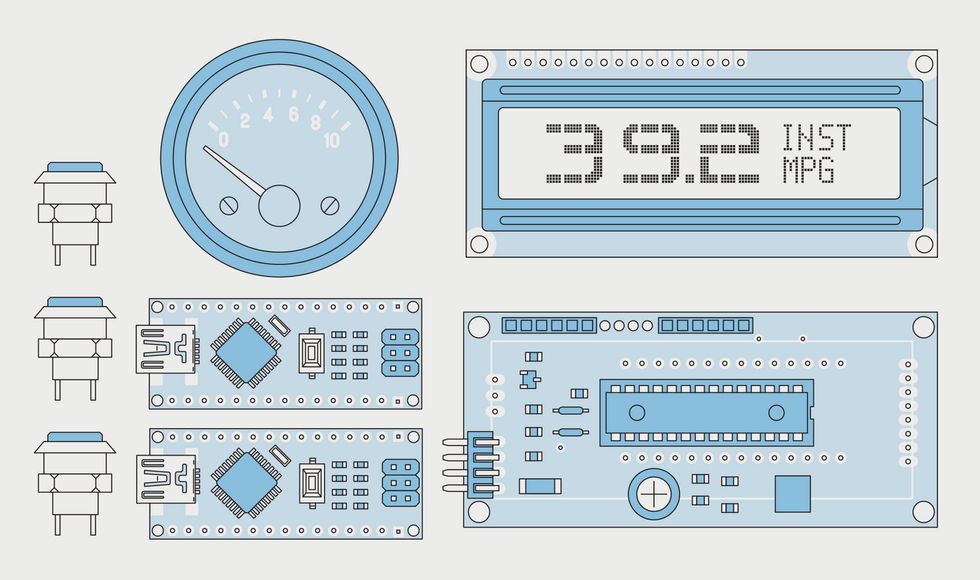
 The components used in this project include two Arduino Nano boards, three push buttons, and a 16-by-2 LCD display board. The unit also includes a vintage VDO oil-pressure gauge, used to show instantaneous fuel economy in units of miles-per-gallon divided by 10.James Provost
Some MPGuino enthusiasts, I discovered, were sending its output to a color flat-panel display-for the modern, glass-cockpit look. I decided to go the other direction and have mine show instantaneous gas mileage on an analog gauge.
For that, I obtained (through eBay, naturally) a vintage VDO oil-pressure gauge, one that was salvaged from a Porsche that was not too much older than my car. In my youth, I used to drive a Porsche, but just because I am now tooling around in a tattered Corolla doesn't mean I can't still enjoy that cool look of VDO instrumentation!
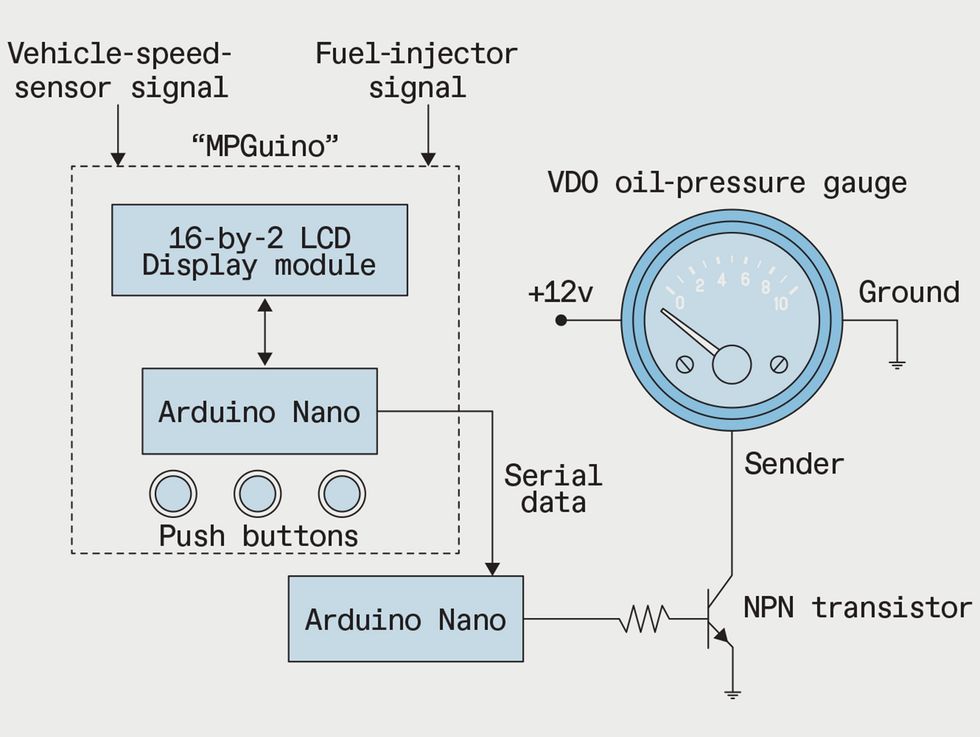
Using that gauge with standard MPGuino hardware proved tricky though. While I'm pretty sure it could be done, the MPGuino code is quite complex, involving interrupts setting and clearing flags. My mind reeled at the prospect of trying to hack on it. So I decided to add a second Arduino Nano to this project, which I figured I could use initially to drive the VDO gauge and later might employ to calculate other parameters for display. It has a serial data connection with the Arduino in the MPGuino, which I found worked best with a 2016-vintage version of the MPGuino software, one tailored to output data serially in different formats.
The VDO gauge I obtained is normally connected to a sender unit that varies in resistance with changes in oil pressure. To mimic that variable resistance, I used a general-purpose NPN transistor. The base of this transistor is driven (through a 220-ohm resistor) by one of the digital output pins on the second Arduino, which outputs a pulse-width-modulated (PWM) wave of the appropriate duty cycle to drive the meter.
It took some experimentation to determine how to calibrate this analog display. Initially, I wrote code for the second Arduino that would slowly increase the duty cycle of the PWM signal, while showing the current duty cycle through the Arduino's serial monitor. I noted the PWM values that corresponded to each digit on the gauge. I could then use linear interpolation to set the PWM value for numbers between those points, coding things so that the gauge would show MPG divided by 10. (The range on this particular oil-pressure gauge goes from 0 to 10 bars.) The needle on the gauge was a little twitchy initially, so I amended my code so that the gauge would display a running average of the MPG values calculated by the MPGuino.
 A standard MPGuino-which includes an Arduino, an LCD display and three pushbuttons, along with some discrete components (not shown)-is supplemented with a second Arduino and vintage oil-pressure gauge. The variable-resistance sender unit normally used to drive that gauge is replaced here by an NPN transistor, which is switched on and off rapidly by a pulse-width-modulated signal from the second Arduino.James Provost
Tapping into the two needed signals at my car's ECU proved to be straightforward-I could get to the relevant wires without having to disassemble the dashboard, and I was able to figure out which they were easily enough from my car's factory-service manual.
But I would also need to tap into the car's 12-volt power. Normally, an MPGuino should be connected to a 12-V source that remains always on. Parasitic drain is not an issue, because the MPGuino turns off the display and goes into a low-power sleep mode soon after the car is shut down.
Connecting my device in the same way would have been problematic, because the VDO gauge and second Arduino I added would have continuously drawn power. So I added a second power input, tapping into the switched 12-V power that runs the car's radio. This powers the added Arduino (through a second 5-V regulator) and the VDO gauge, which both then turn completely off when I shut down the engine.
It's not yet clear how many more miles per gallon I'll be able to achieve just from changes in how I drive the car. But even if I'm not able to improve my gas mileage all that much, I'm finding that having the information presented on a gauge from a Porsche in my old Corolla really makes me smile.