How to Build a Kitchen (and Why)
Well, looks like it has happened again.
Since the last time we spoke, I got sucked into building my 17th(?) kitchen, and I have finally emerged from its messy yet addictive grasp as I stand here at the new breakfast bar, typing this report to you.
Why am I so hooked on this strange pastime? And more importantly, why am I so excited to tell you about it, when most MMM readers probably don't have house building at the top of their list of life priorities?
It's probably because the concept of home is such a core part of life for me: a place that allows us to take care of our families and ourselves, host friends and build our lives outwards from there. And to me the most important part of a home is the place where you prepare and stash your food supply, which also happens to become the spot where our kids spread out their homework, we have our deep talks, and the natural gathering point for just about every party.
There is of course a money side to all of this too: housing is the most expensive thing in most of our lives (including my own), and this cost has exploded upwards in recent years due to a crazy imbalance of supply and demand.
People want homes with beautiful, highly functional amenities like kitchens and bathrooms, which means those houses get bid up to higher prices by those willing to wildly overpay, which leaves the more investment-minded among us swearing at the irrational market conditions, or buying ugly fixer-uppers as a compromise.
This leads to a second shortage: a shortage of tradespeople like myself, because there are a lot of flimsy little sinks, leaky plastic-handled faucets and fake woodgrain oak cabinets out there, but not a lot of people with the experience to rescue that 1982-style kitchen and bring it into our glorious modern present.
Which means that if you can even find someone willing to build you a new kitchen, you'll often see quotes from $25,000 to north of $75,000 for the prestigious but not-all-that-difficult job.
As you'll see below, this translates to an incredibly expensive labor rate of between $100 and $300 per hour, which is money you get to claim for yourself if you are willing to do some of the work. And the rewards can be even higher than that, because when you upgrade a kitchen in an expensive housing market, you typically create even more than $25-75k of additional value. This will flow back to you in the form of more cash when you eventually re-sell, or higher rental income every single month if you are fixing up a rental property.
And one more real estate secret: a kitchen is effectively just a really big fancy version of a bathroom, so if you learn the skills you can do either one. Imagine the God-like power of being able to point your finger and call into existence kitchens and bathrooms where none existed before!
So in this article, I'm going to whisk you through a high-speed tour of the main steps of rebuilding a kitchen, focusing on the things that make the biggest difference in function, cost, and difficulty - in other words, the things I wish I knew 23 years ago when I started working on my first kitchen.
We don't have space here to cover every detail of every step, but as with any important endeavor, it's best to start with the big picture anyway. And from there, I hope to leave you with a much more empowered starting point to do one of three things:
- To know what to look for (and how to tune your Bullshit Meter) when hiring someone else to build you a kitchen.
- To strategically break off parts of the work you want to do yourself, to save time and money even if you hire out the rest.
- Or even to do the whole thing yourself, seeking help from more experienced friends or YouTube videos as needed to get the full details.
So let's get into it! The 11-ish main steps to designing and building the most joyful room in your house.
Step Zero: Do You Need a Permit?
In most areas, this is a Yes" if you are messing with plumbing and electricity inside the walls, otherwise it's maybe". But rules vary widely around the world - I've worked in some places where the inspectors will come knocking if they see so much as a scrap of drywall poking out of your trash can, and others where people build a whole barn without raising the eyebrow of the authorities. But whether you get a permit or not, the most important part is to do the job right - this means tidy, professional work that meets the local building code and would pass an inspection even if nobody will see it. It will allow you to sleep well and avoid troubles down the road.
1: Figure out the Cost
This one is obviously all over the map depending on your tastes, but we can start with the following overly simplified table:

The dollar figures are just for the materials including appliances, and the labor hours are what I'd budget for myself or another professional - you can adjust as needed based on your own skill level. I'll also link a slightly more detailed version of this spreadsheet here.
Super Duper Shopping Pro Tips:
 Here's a recent example - shocked by Home Depot's sudden price increase on sink traps, I checked Amazon and sure enough they were still the proper price of about three bucks. So I bought five to re-stock my inventory because I just know there are many more kitchens (and bathrooms) in my future.
When it comes to cost-efficient renovations, material sourcing is everything. Here are a few of my own favorite tricks:
- Craigslist, Facebook Marketplace and Recycled Building Material stores are amazing. It takes more time and skill to find and use materials from these sources, but in exchange you get your stuff for about 75% less. In the past I've bought a $2000 fridge for $500, doors and cabinets and light fixtures for next to nothing, and stocked up on reclaimed wood and steel pieces worth tens of thousands of dollars for free, in exchange for a few hours of my time.
But sometimes you have different goals, like faster speed or or the higher-end finishes that are only possible with brand new materials. In this case, you move down the list.
- Amazon is now better than Home Depot for many things. Light fixtures, sinks and faucets, even saw blades and big rolls of PEX pipe. All with a way wider selection, fast shipping and at lower prices than the older retailers. I'll still get my lumber and drywall and paint locally of course, but for everything else I check online first. The bonus is that this also cuts down my mid-project trips to the store by about 80%.
- IKEA kitchen cabinets usually offer lower cost, easier/faster design, and - surprisingly - better overall quality than what you get with special order cabinets from the home renovation stores. More on this in the cabinets section below.
2: Layout (and knocking down walls!)
 Ahhh, my favorite thing ever: removing unnecessary walls!
The basic principle I like to follow in kitchen design, at least for the smaller and older houses that those of us in the fixer-upper crowd tends to purchase, is MORE:
- More floor space and countertops
- More open-ness to the rest of the house
- More storage, especially drawers
Most houses from past eras have the kitchen walled off into a tiny booth. And the good news is that you can usually just chop down the unnecessary walls between that booth and the living room, replace one of them with a nice spacious island, and transform your house for the better.
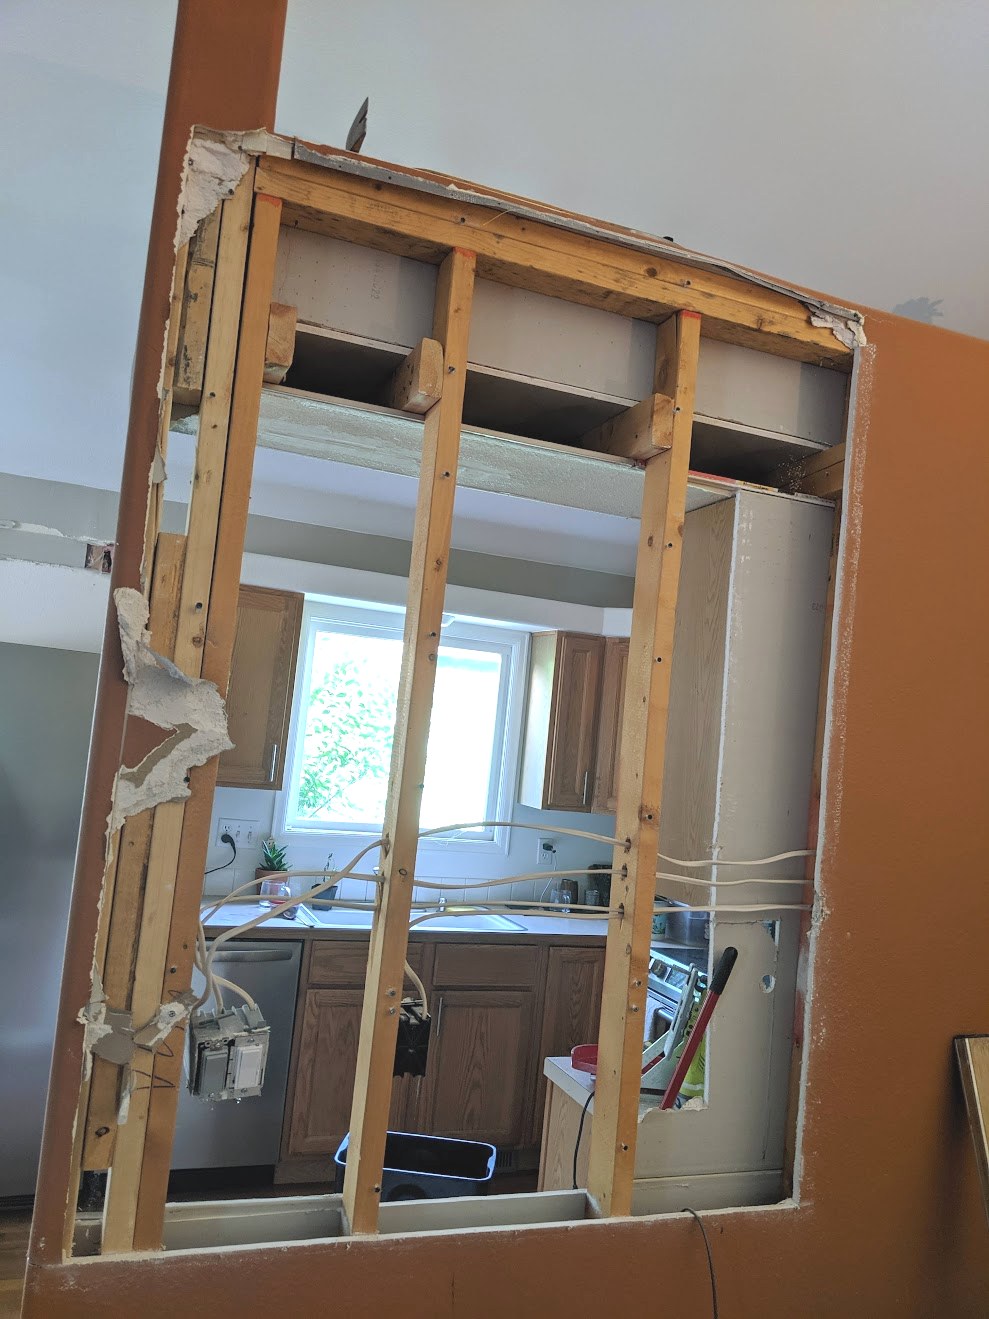
Bonus! How to figure out if a wall is load bearing:
My safe answer here is, Ask a structural engineer or at least a house builder", but since I've done a lot of both activities, here is a shortcut:
- Figure out what's over top of the wall in question (is it an upper floor or just the roof?)
- If it's the roof, peek up into the attic. If the house is a newer design it may have trusses. In smaller houses (up to about 30 feet wide), this usually means all the weight of the roof is resting on the outside walls, meaning most or all the interior walls are just cosmetic.
- If your kitchen is on the first floor with another level above, the wall may be load bearing, especially if it is perpendicular to the floor joists above it. In this case you can still open up the wall and replace it with a beam and posts. But that's a task for experienced builders - bring in some help if you don't know how to do this already.
Basic Layout Principles
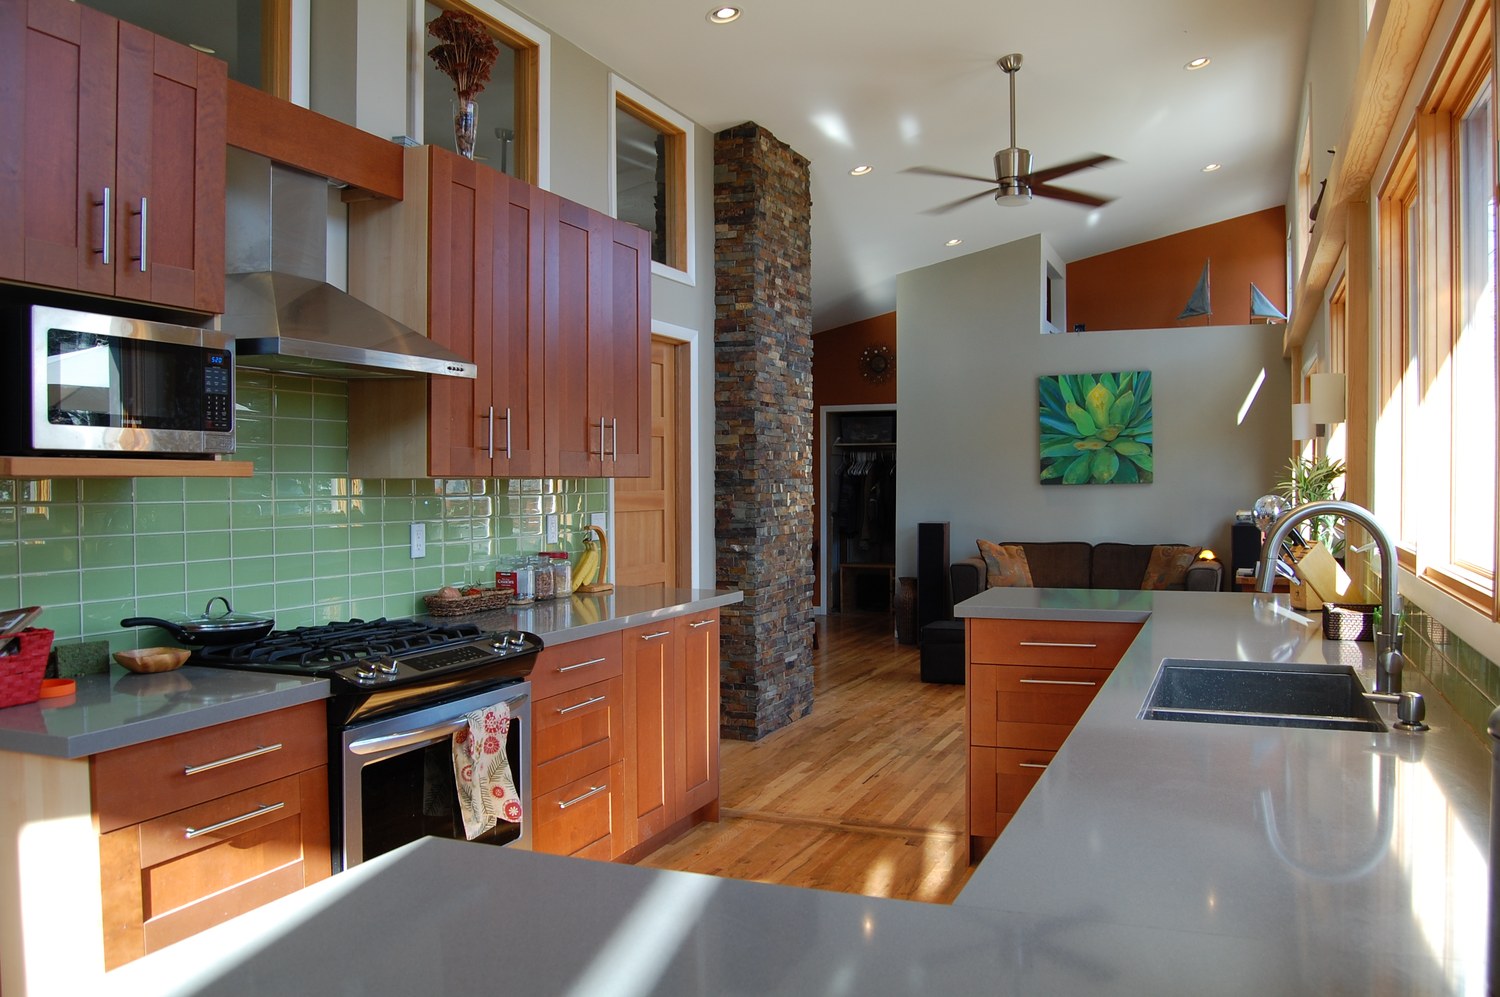
As a quick example, let's use a case study of one of my own rebuilds to point out both things I think did work, and other places I made some mistakes and would do things differently next time. (This was in my own house, so you'll have to forgive my taste for somewhat wild colors!)
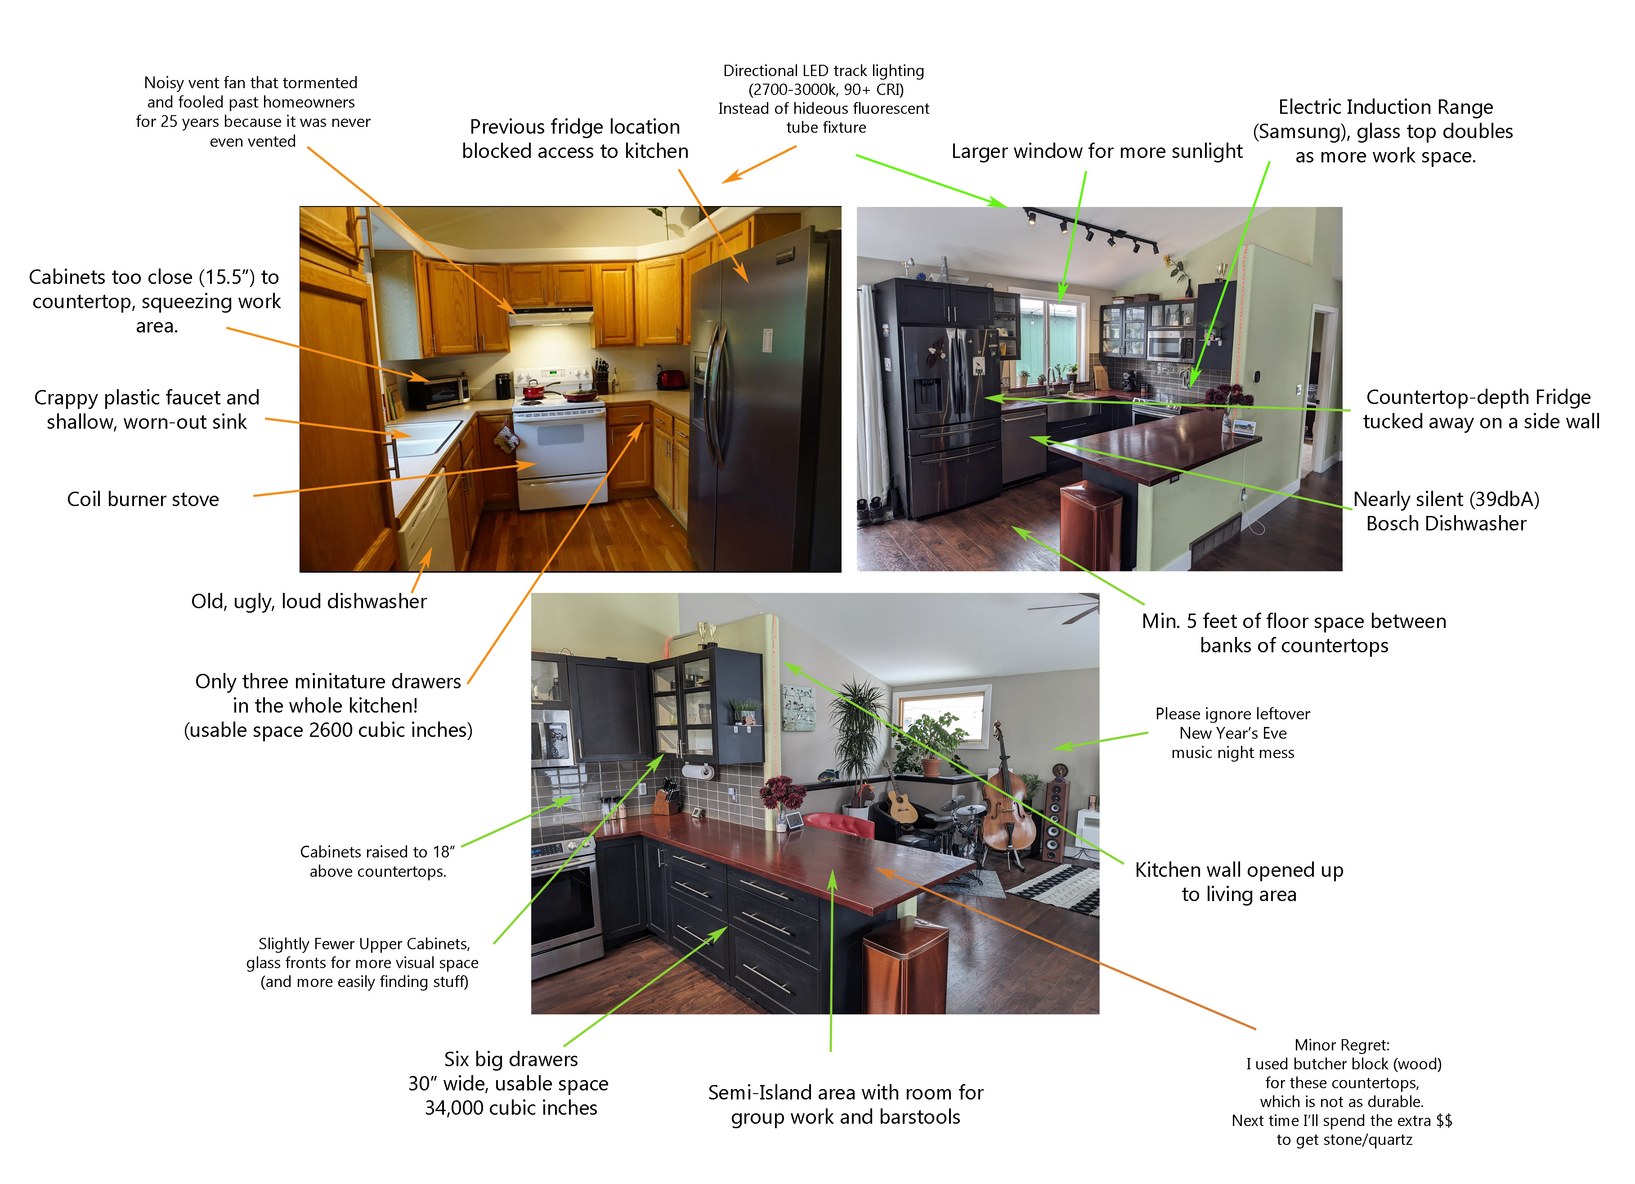
Whoo! Okay there's a lot of info in there, but it's worth reading through because it captures many of the things I like to cover in a new kitchen. The biggest principle to follow is just to give everything enough space - especially the chefs themselves. This sometimes requires clever space-saving tricks, but it's also why I end up moving or removing walls so often. Small spaces in your own house suck!
Design Shortcut: The IKEA Kitchen Planner

To figure out how everything will fit (and look), you need at least some scale diagrams, but even better is a 3-D model that you can look around. There are lots of options here ranging from old-fashioned graph paper to sophisticated but sometimes clunky design programs like Sketchup. But one interesting trick is just using the free tool on the IKEA website, which can be useful whether you plan on buying their cabinets or not. https://kitchen.planner.ikea.com/us/en/
For example, take a look at the before" picture of my old kitchen above. Before building the new kitchen, I spent about 15 minutes on the IKEA kitchen planner website and I already had a pretty close visualization of how my finished kitchen would look and feel.
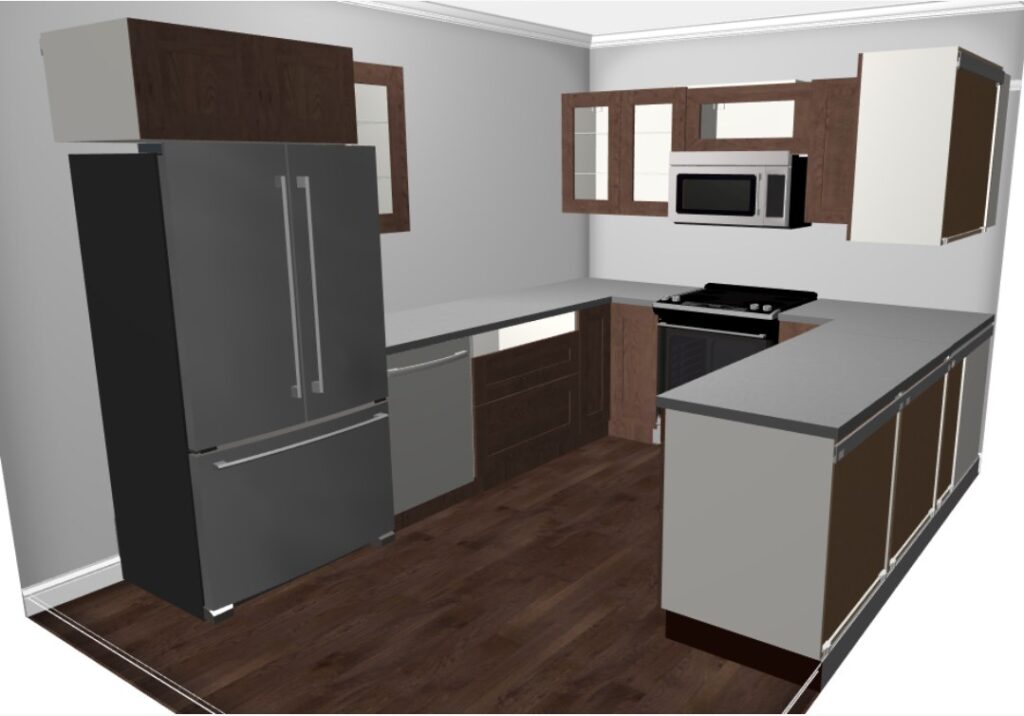 When I first saw this, I thought WOW this is so different and so much better than my old kitchen!" Now, sure enough it simply looks like my actual kitchen and it's even better than I had hoped.
3: Building new walls
In most cases, you'll be removing more walls than you build, but sometimes you'll need to add some as well. The most common situations for me are:
- Moving an existing wall back to create more kitchen space
- Creating a booth" of walls to enclose a refrigerator or build a food storage pantry
- Building the half wall (typical height is 34.5") that eventually becomes an island.
General principles:
- It's way easier to build a new wall than to mess around with too many changes to an old one. So I usually start with a complete demolition of any old walls, then proceed with a clean slate.
- If you've never learned how to frame a wall flat on the ground first, it's a fun and life-changing skill! Here's a 52-second summary on YouTube.
4: Plumbing (and venting)

In many kitchen remodels, you end up leaving the plumbing fixtures (sink, dishwasher and fridge water line) in roughly the same place, and if so this part of the job is minimal.
But I also want to open your mind to the possibility that these things can be moved without too much trouble, and you can even create brand new ones whenever you need em. While the finer points of code-compliant plumbing are best learned from the book or video of your choice, here are my favorite basic principles and useful shortcuts:
- Cut back any obsolete copper plumbing and transition to PEX in a convenient location, which will make all your new work cleaner and easier. In a full house remodel, I usually do this right after the main house shutoff valve so the whole system can be built right from scratch.
- Sink drain lines are usually done with 1.5" black ABS (plastic) pipe which is quite easy to work with. If you're doing a big project, grab a few ten-footers of the stuff up front as well as an assortment of fittings and the glue.
- Drain pipes should slope about 1/4" per foot, and if you need to add a new air vent, consider a Studor vent, which saves you the pain of trying to connect your drain to a pipe that runs all the way through your roof. (I also like to minimize roof penetrations because it makes your eventual re-roofing job quicker and more reliable and leaves more room for solar panels)
We'll cover the sink, dishwasher and fridge plumbing separately below.
Related MMM Article from way back in 2012 (but recently updated):
How to Become a Kickass Plumber - with PEX
5: Electrical

Like plumbing, electricity is a whole trade in itself which is not comfortable for everyone. And you can indeed kill yourself if you touch live wires in the wrong way. So if in doubt, hire an electrician.
But since I happen to enjoy this trade myself, I made a point of learning the national electric code (currently called the 2020 NEC) enough to wire a few full houses from scratch and pass several final inspections: everything from digging the trench and running new buried service lines in conduit to the meter box, to subpanels and solar inverters down to the last light switch.
But I'm still not a professional electrician, and codes vary by region - so be sure to double check any ideas you get from me and do not assume anything you read is totally correct.
With all those disclaimers aside, here are the most common situations that come up when renovating a kitchen:
Unwanted electrical lines in a wall you are removing: I label these carefully, turn off the power, then pull everything out until I reach the nearest junction that's in a wall I am keeping (or sometimes this will be in the ceiling or attic). Once the new walls are in place, you can run fresh wires to the new boxes and fixtures.
Adding new outlets to serve new countertop areas:
The basic requirement is a minimum of two 20 amp circuits, protected by GFCI outlets, with outlets at least every 4 feet along your work space. Plus, ideally the fridge, dishwasher, disposal and microwave are on their own separate circuits which is required in brand new builds. So, your project may be able to tie into the existing circuits or you may need to pull some new ones.
Adding entirely new circuits to your home:
Although this may sound like a black art to non-electricians, it's actually quite straightforward once you learn how to do it. The hardest part is usually running the wire all the way back to your circuit panel, unless your kitchen is directly over an unfinished basement or crawlspace. So if you find an agreeable electrician willing to give you a discount in exchange for you doing the dirty work of properly routing the wire while they only do the final hookup in the panel, this can be a nice hybrid approach.
If you want to see the details of what's involved in adding a whole new circuit and breaker to your panel, there are lots of walkthroughs on YouTube including this one I made myself on how to install your own electric car charger.
Other stuff to remember at this stage:
- An outlet for your eventual over-the-range microwave (or just a wire if you are using a vent hood), centered about 78" above the floor so it is in the cabinet directly above
- A 4" steel vent pipe that goes from behind that microwave to somewhere outside your house (see your install manual for exact details)
- An outlet beneath the kitchen sink for the disposal, controlled by a wall switch at a safe distance nearby
- Power for your dishwasher (I usually add a standard cord to my dishwasher so I can plug it in to this same outlet under the sink)
- Maybe even wiring for an outlet inside one of your cabinets, just behind the top drawer, for charging phones and other gadgets nicely out of sight
6: Drywall and details
You're finally ready to cover everything up! This part is relatively easy, but if you've never done drywall before, a few things I find helpful to get started:
- Buy plenty of supplies (4*8 sheets, mesh tape, boxes of compound (mud), plus a trough and knife set) in advance
- When installing sheets, use either a roto zip tool or a cordless buzzer" multi tool to do the cutouts for your outlet boxes. Much better than manual hand saws or trying to do it with knives.
- As you open each box of mud, dispense it fully into a clean 5-gallon bucket with a lid. Fill up your trough periodically from this bucket. Never work directly from the box, or the bucket.
- I find that a light layer of spray adhesive before adding the mesh tape helps it stick much better
- Apply 2-3 coats of increasingly smooth mud before you bother with sanding (experienced drywallers typically only need to sand once at the end)
This is the point - after drywall and at least a coat of primer or base white paint - where you would install your flooring if you are changing that out as part of the remodel. These days I'm a big fan of engineered wood or LVP flooring which is easy, tough and attractive. But for ultimate durability in a busy dogs-n-kids-n-giant parties household, floor tiles are still the gold standard.
7: Cabinets
Although this step is the most exciting part, it's also one of the easiest. You're just trying to put in a line of giant boxes as strong, straight and square as possible. For conventional cabinets, this means that a level and studfinder and shims are your best friends.
With IKEA cabinets, it's even easier to get it right, because all of the cabinets (both upper and lower) just hang on their proprietary metal rail system. So if you get the rails right, the cabinets follow naturally. Another huge bonus: it's easy to slide the cabinets back and forth and make adjustments before locking them into their final positions.
8: Countertops
If your budget will allow the higher cost, a stone countertop (quartz or granite or similar) is usually worth the cost. That cost is currently about $60-120 per square foot which can add up to a few grand for a large kitchen, but in exchange you get something that looks great, lasts forever and cleans up more easily than the other options.
Of course, that high cost (and my dislike of dealing with appointments and outside contractors) has meant that I have experimented with the other alternatives of solid wood and various types of tiles on some projects. They still look nice and function pretty well, but I have always regretted the choice in the long run and wished I had done the quartz. Possibly because of the human psychology factor: a small daily annoyance of worrying about scratching your wood countertop is with you forever. Whereas a one-time expense for the stone countertops quickly recedes into history and you forget about it. And like the rest of a kitchen upgrade, it tends to come back to you in the form of increased resale or rental value anyway.
9: Sink and Faucet
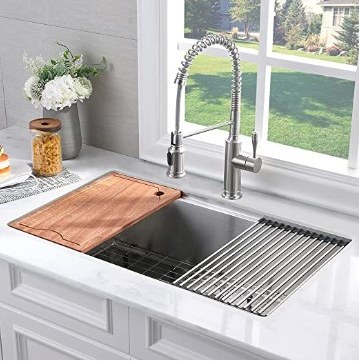
Thankfully, this part is the opposite of the countertops: surprisingly cheap and full of beautiful options depending on your taste.
Way back in 2001, I remember paying $600 for a sink and $300 for a faucet, just to get something substantial and modern that didn't look like it was from a 1980s Atlanta Georgia suburb (an aesthetic that runs strong in Home Depot products because of the company's origins in that time and place).
But now, thanks to Amazon we live in a whole different world. You can have your choice of massive, modern sinks in the 200s, and even beautiful faucets are under $100. The prices are sometimes so low that I am nervous about the quality, but so far everything has been a pleasant surprise on the upside. TBD sink drain pic above.
Bonus: How to build a nice new sink drain:
Your old kitchen probably has an ugly nest of pipes under the kitchen sink, and you'll at least need to rework this part because the new sink will be bigger and in a slightly different place. So we might as well cover this right here:
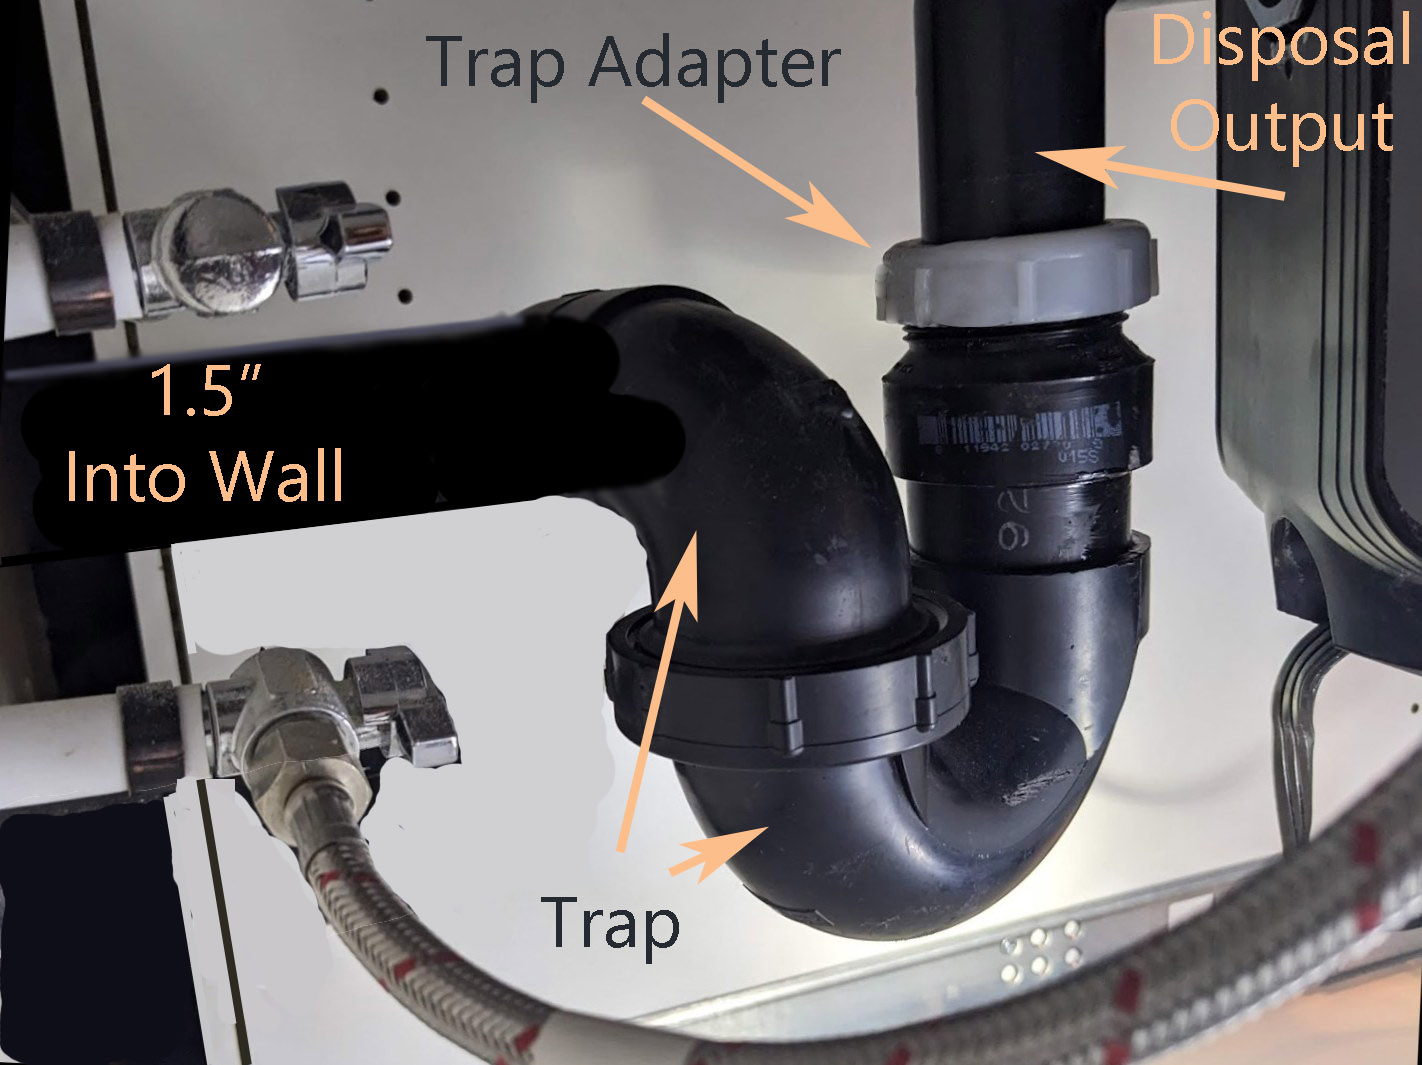 Note: I had to photoshop a correction from a helpful reader into this photo after the original publishing date, but now I believe this final result is correct.
Starting with the fancy new sink (which comes right after countertops), you
- Install the disposal unit which doubles as the drain as well
- Loose-fit a trap adapter to the disposal output and then figure out what direction to angle your trap to create the simplest/tidiest run to the wall pipe
- Add elbows and straight bits as needed to get the water to that final destination
- Once you are sure everything fits, mark the joints with tape or a marker, then carefully disassemble, glue, and reassemble/tighten everything. Ready for water within an hour!
10: Appliances
This is yet another area where we've seen deflation over the years rather than inflation: the quality and features of appliances seems to keep going up, while prices come down. And the used market is even better: appliances have a very low resale value, which means if you shop carefully you can get new-ish units for about 75% less than brand-new ones.
However, a note of caution: Don't buy used stuff unless you trust the seller and/or get a chance to test it. I've been fooled twice buying used seemingly high-end dishwashers that seemed great ... but in retrospect the person was selling them because they didn't work properly.
Me: Wow, this is a really nice $1500 dishwasher - why are you selling it?"
Seller: Oh... I was upgrading my kitchen and this one just doesn't match the new appliances."
Me: (naively overlooking some other red flags about the seller's living situation): Okay here's my $200 in cash."
On a third occasion, a friend and I almost made the same mistake when buying an exotic under-counter European fridge, but thankfully noticed that the seller had it sitting in his garage unplugged when we came to pick it up. When I asked to see it running, he pretended to have a shortage of extension cords so I pulled one out of my van. Sure enough, when we plugged it in, the damned thing wasn't even working. Shady!
Other tips: fridges, microwaves and especially ovens/ranges are a safer bet to buy used because they tend to just work for decades.
Also, if you live in a climate with sub-freezing winters, don't buy a fridge, dishwasher or washing machine that someone has moved into their shed or garage during the cold season. Because the water in the tubes and valves will probably have frozen and burst without their knowledge, giving you a messy and complex repair job the first time you fire it up.
Because of all this, I have had many success stories with used appliances in the past, but I still tend to buy all new appliances these days now that time has become more scarce than money for me. If you're younger and still trying to optimize for dollars, you should still check Craigslist and Facebook Marketplace regularly.
11: Finish work!
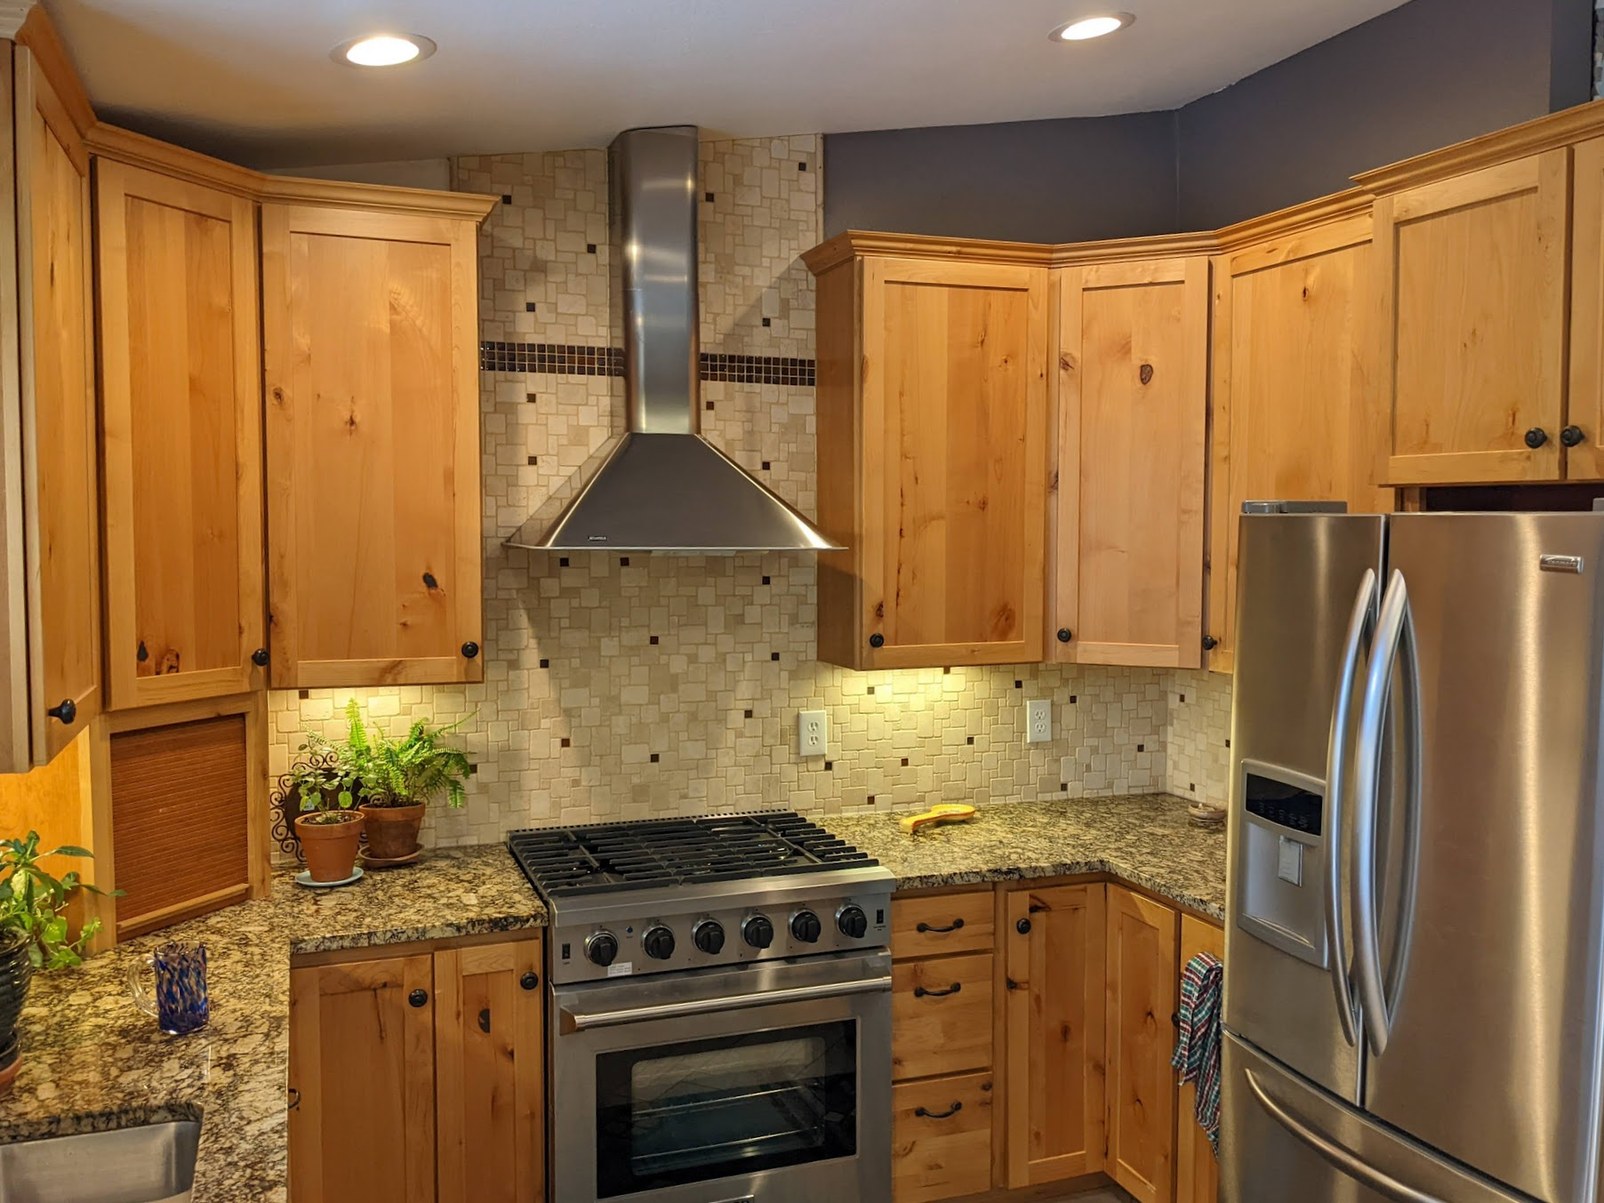 Despite the very small kitchen, this house in my neighborhood recently sold for a preposterously high price, mainly because of nice touches like this full height backsplash. When renovating, more tiles are usually better.
At last, we're in the home stretch. You can add as many custom flourishes to your kitchen as you like, but just to share a few of my favorites:
- An artsy tile backsplash is a great way to make any kitchen way more interesting. I like to tile the entire area from the countertop up to the upper cabinets. In some cases on empty walls, I've gone all the way up to the ceiling to create an even bigger feeling of space.
- Consider hiding a power cord inside a top drawer somewhere, which you can then hook up to a nice multi port USB charger, so you can keep all of the phones, tablets, bike lights out of your precious work area.
- Stainless steel outlet plates and modern-style grey outlets and switches add a more polished and high-quality look to any area, especially kitchens.
- Undercabinet lights are worth the effort, as they provide great illumination while cooking and make for beautiful ambience even hosting parties or dinners.
Wow, that was a Lot!
This may be the longest MMM article in history, and yet we still only skimmed through it. But I hope this summary gives you at least a peek at the countless fun, useful and profitable skills that you can learn to make your life as a homeowner (or as an occasional contractor) more joyful and satisfying.
If you have more questions about specifics, drop them into the comments section below and everyone can help share some answers. And of course, this article will surely be full of errors and omissions when I first publish it - please feel free to point those out and I'll make updates as well.
Happy cooking!